The Mass-Fab Macerator (MFM) is a type of EMC generator that uses Macerators to generate EMC extremely rapidly, capable of exceeding the output of a Power Flower by an order of magnitude. However, the MFM requires EU to run, and external EU power sources like Solar Panels and Solar Arrays are too tedious to manufacture without a factory of their own, while Generators of both types produce too little power to be viable for the MFM's often high power demands. However, the player can start small and slowly upgrade the MFM over time, making it more and more effective. Alternatively, the Redstone-Powered MFM (see below) does not require any external power source, and is arguably more efficient in almost all cases.
This is not to be confused with the Mass Fabricator, which is a separate entity.
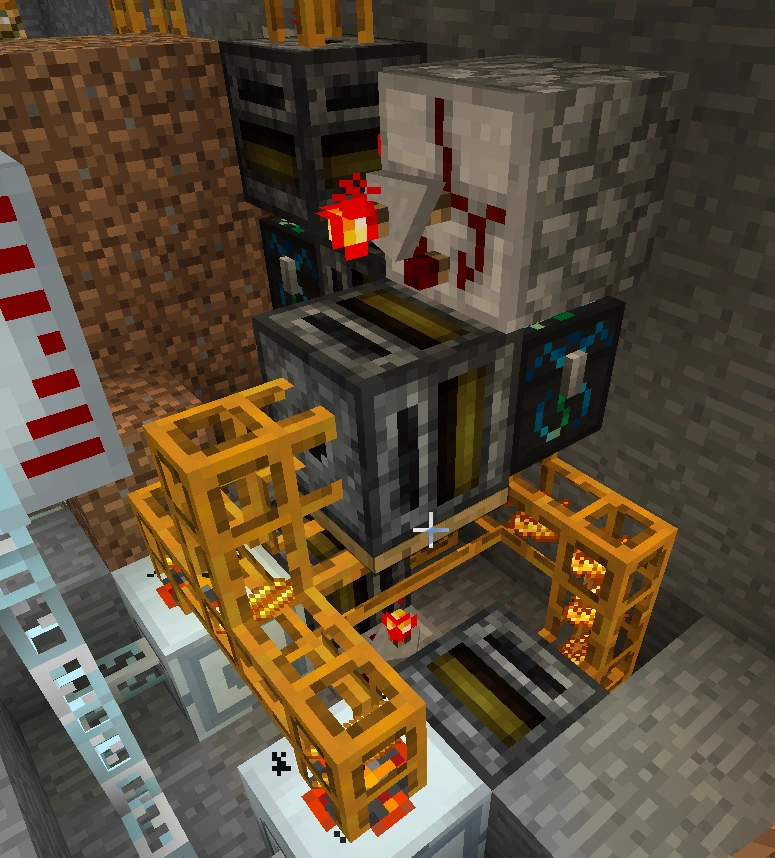
MFM with two macerators. The outflow pipe in the background outputs approximately 100 diamond per minute.
Basic Principle
A Macerator can process either Bones or Blaze Rods into more EMC than it was fed. The product is then fed into an Energy Condenser to turn it back into a bone or blaze rod, starting the process over again. The Macerator grinds a bone into 5 bone meal instead of 3, generating 96 free EMC per cycle, and grinds a blaze rod into 5 blaze powders instead of 2, generating a massive 2304 EMC per cycle. Thus, the player should acquire a blaze rod as soon as possible on servers that don't nerf/disable this method, as it generates EMC 24 times faster than bone can!
Construction
The final goal is a small factory composed of a Macerator, 3 Filters, an Energy Condenser, around 5 Pneumatic Tubes, a Timer, a Blaze Rod, and enough power to run the macerators at full speed with 16 Overclocker Upgrades (plus 2 Transformer Upgrades and 1 Energy Storage Upgrade). As that requires 3,689 EU/t, that typically means 14 HV Solar Arrays and 8 MFSUs. However, that's a lot to build, even well into mid-game. Luckily you can start with less overclockers and build up as you find or produce more materials. The Macerator page has a table on EU/t required by overclocker count. Don't forget that as solar power does not work during night, you need twice the usual amount to make up for it during daytime, and MFSU's to store the excess power for use during nighttime.
Construction of the MFM factory is split into 6 stages, each stage getting progressively more effective.
Stage 1: Manual Fabrication
This step is simple: build a standard macerator, power it with a solar panel and BatBox, and feed it bones to make bone meal. Put the bone meal in an energy condensor to turn it back into bones, and repeat the process. This is slow and tedious, but produces EMC faster than hunting around and gathering by pickaxe. The disadvantage is the energy condensor requirement, which is heavy on exotic materials like Diamonds and Covalence Dust. It's also painfully slow -- mining trees and tossing those in the condenser is probably more worth your time. You want to get out of this stage as soon as you can.
Stage 2: Basic Automation
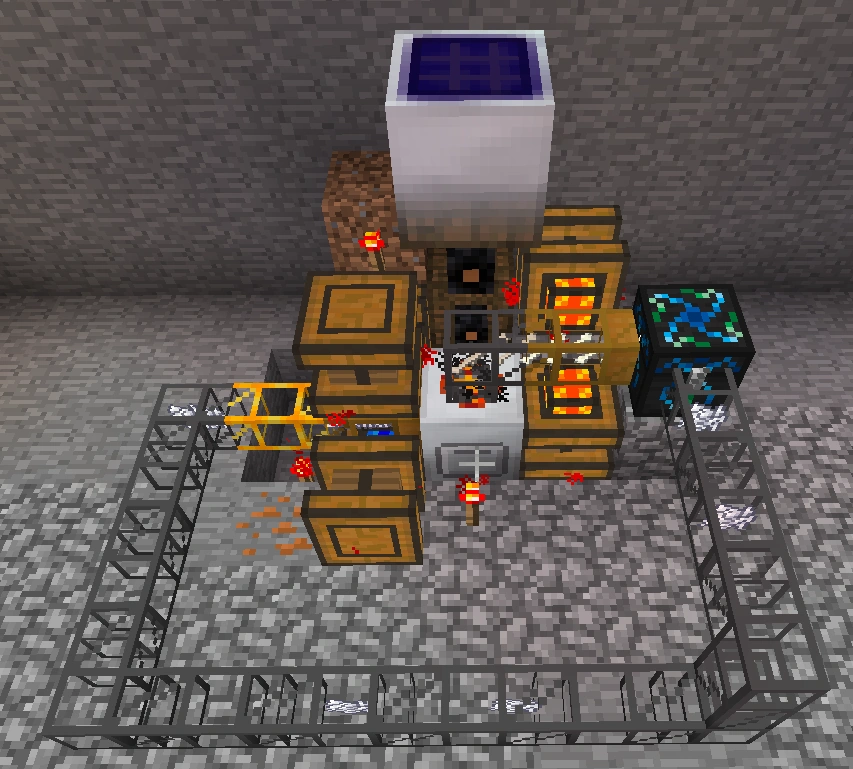
A flawed MFM that will dump bones on the ground.
This stage turns the macerator into a proper factory, so you can step away and let it fabricate while you do productive things of your own. To do this, you should upgrade the macerator to a Rotary Macerator, and build some redstone engines and pipes.
Use one redstone engine and some wooden pipe to send bones from the condenser to the top of the macerator. Use 4 engines to pipe bone meal from the side of the macerator back into the condenser. Power the macerator with a bat box and solar panel.
Adding an overflow pipe keeps from wasting bones by dumping them on the ground, but starves the macerator a bit.
This configuration has a flaw, however: once it warms up, the single redstone engine will pipe bone into the macerator faster than it can process it; extra bone falls to the ground and eventually disappears. To solve this, build an overflow pipe that takes bones back to the condensor.
A better solution is to use filters and pneumatic tubes, but those take more effort to manufacture. Build them when you can.
(Note: Make sure that the pipe feeding in to the macerator is connected to the TOP of the machine. This goes for (almost?) all IC2 machines.)
Overall, this factory produces about 17-20 extra bones per minute when it's working right (not dumping bones or starving the macerator), equaling about 1600 - 2000 EMC per minute. Not bad. However, the machine could still use major improvements, so continue on to the next step.
Stage 3: Improved Speed & Reliability
In this stage we want to accomplish three major tasks:
- Replace the redstone engines and pipes with Filters and Pneumatic Tubes (if we haven't already)
- Add an output path for our surplus EMC
- Replace Bones with Blaze Rods


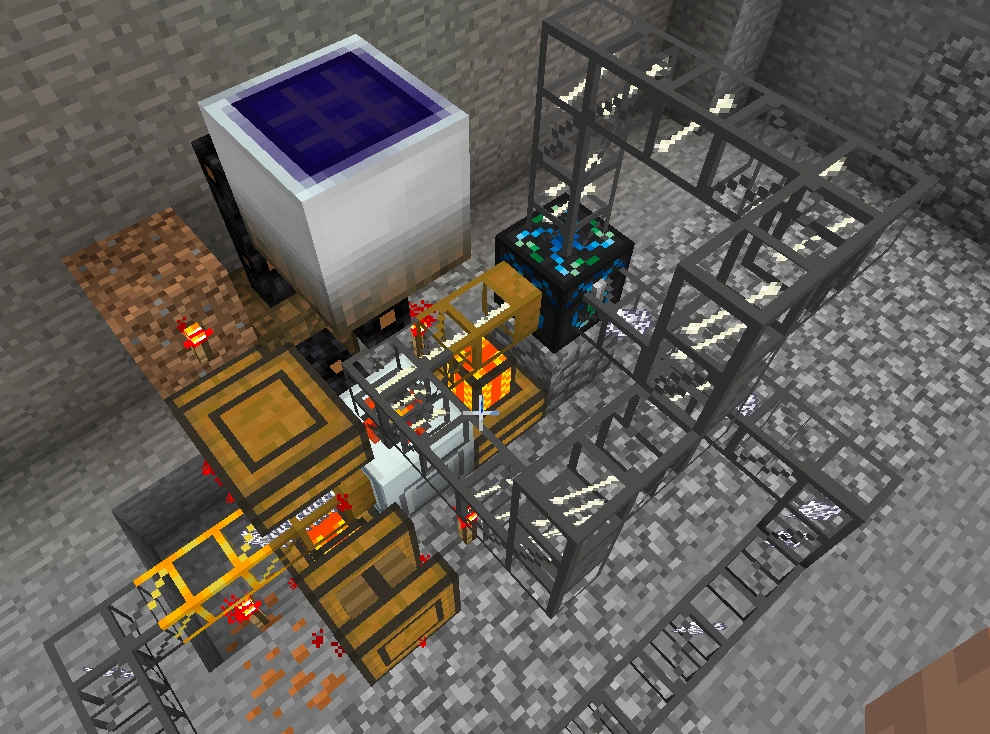
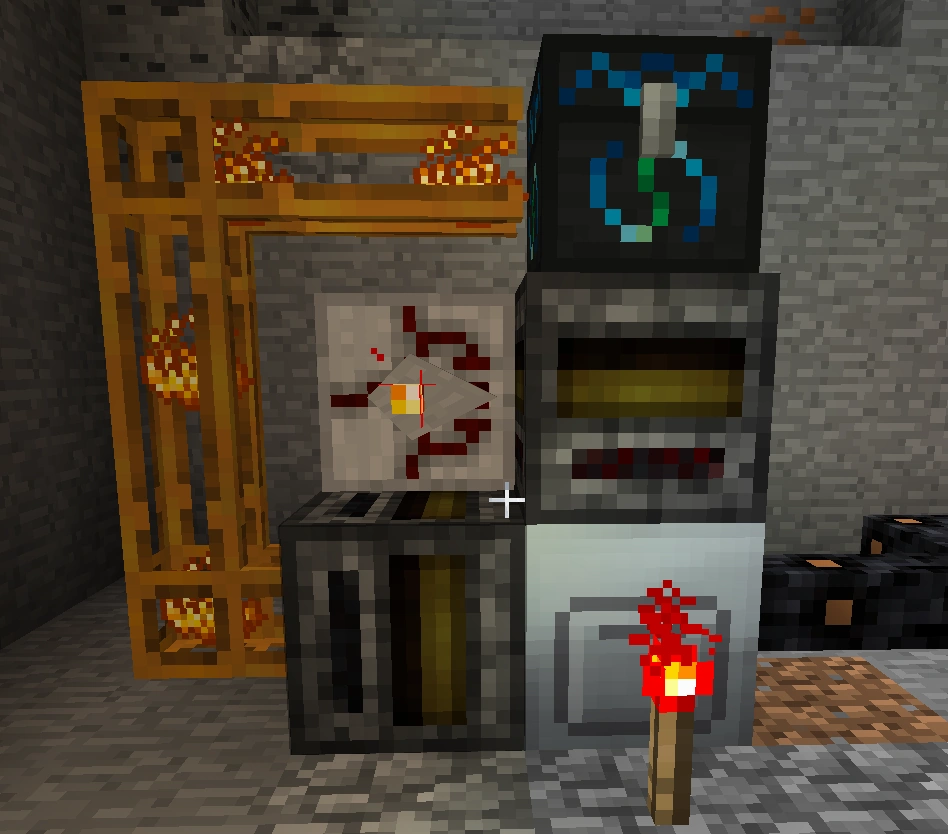
Mass-Fab Macerator that uses 2 filters, a timer, and 4 pneumatic tubes.
Step 1: Filters
Filters and Pneumatic Tubes are more of a pain to manufacture, but once you have them you'll never want to go back. They're more reliable than redstone engines and common pipes because they won't dump items on the floor. They also allow specifying which items they pump and how much, which will be valuable both for feeding the macerator and for creating an output path. It's a pain to build the red-doped wafers for filters, and timers are also time-consuming... but the payoff is big.
First, we want to make our machine reliable and well-tuned. Position the condenser two blocks above the macerator, with a filter in the middle. Use a screwdriver to point the filter in the correct direction. Place another filter to pull from the side of the macerator. Use pneumatic tubes to pipe the powders back to the condenser.
Now to configure the filters. Right-click the first filter and put 1 bone inside. Right-click the second filter and place 5 bone meal inside. Last of all, place a bone in the top slot of the condenser. Now place a timer in the corner between the two filters (with a dirt or stone block in the back to hold the timer up). Use a screwdriver to turn it so it powers both filters. Finally, right-click it and set its time to the lowest interval: 0.2 seconds.
Step 2: Output
Next we want to add an output. This requires another condenser, filter and timer. Add a filter to the side of the condenser. Right-click the filter and add 64 bone and 64 bone meal. Place a stone or dirt block behind and above the filter and place a timer above it. Set the timer's interval to one second. Place the condenser on the output of the filter, and right-click it. Place a higher EMC item such as a diamond or diamond block in the condenser's upper-right slot. The main condenser fills up with bone quickly, but any time it has a stack of 64 bone or bone meal, the output filter will suck it out and use it to produce diamond blocks instead. This allows higher-density storage.
Step 3: Blaze Rods
This is a difficult step because Blaze Rods can only be obtained in a Nether Fortress. Tekkit adds Jetpacks and other items that make this easier, however, so you should find a fortress and grab at least 1 blaze rod asap. A much easier alternative is to get a Philosopher's Stone and use the mob transmutation (default R) to turn pigmen into other Nether mobs until you get a Blaze. Blazes are a rare transmutation so bring plenty of fuel or a Klein Star so you can perform enough transmutations to get a Blaze. Once you have a Blaze Rod use a Condenser to produce lots of copies of it, and start replacing all bones in your factory with Blaze Rods, and all bone meal with Blaze Powder.
Doing this amplifies your EMC production by about 36x.
Stage 4: High Speed
It's time to start adding upgrades to the rotary macerator. Each Overclocker Upgrade adds speed additively (vs regular macerator's multiplicatively, more on that later), but also requires exponentially more power per additional overclocker. This means upgrading your Solar Arrays to medium at least. Transformer upgrades allow the macerator to accept higher power voltages (you'll only ever need 2 for HV Solar Arrays). Most important of all, you'll need Energy Storage Upgrades to increase the energy buffer the macerator holds (by default 800 EU only), which you'll require to upgrade overclockers with in around the double digits range. There is no limit for rotary macerators (unlike regular ones), but as the speed only increases linearly while power consumption per upgrade increases exponentially, it is not advised to go much farther than 14 overclockers.
At this point, you should probably switch to a higher-density output item. Diamonds are likely to fill up chests very quickly unless you're piping them directly into another machine for processing. Red Matter is an excellent choice for high-density storage. While the Red Matter Furnace and DM Pedestal are the highest EMC items in the game (save for higher Klein Stars, but they can't be directly converted to EMC), they may not necessarily be better choices, as many servers outright ban those two items.
Stage 5: Maximum Speed
In the final stage, it's time to throw out that Rotary Macerator and replace it with a normal Macerator. Why would you do such a thing?! Because once you hit a certain point of upgrades, the rotary macerator becomes slower. At 9 overclockers, a regular macerator breaks even (1% faster, roughly) with a rotary macerator with 0 overclockers, at 0.8 seconds per operation. Adding 10 overclockers to a rotary macerator increases its RPM from 7,500 to 12,500, cutting its operation time to 60% of 0.8 seconds = 0.48 seconds. A regular macerator has 0.55 seconds per operation at 10 overclockers. At 11 overclockers, a rotary macerator's operation time is 0.46 seconds, whereas a regular macerator's operation time is now 0.40 seconds (thanks to multiplicative speed increases). Therefore, 11 overclockers is the first overclocker count where regular macerators beat rotary macerators in speed, not 9!
To complete your factory, get the macerator up to 16 overclocker upgrades, 2 transformer upgrades, and 1 energy storage upgrade. Power it with a constant 3,689 EU/t, which 14 HV Solar Arrays and 8 MFSU's will do to get your first maxed speed MFM!
Stage 6: Mass-Production

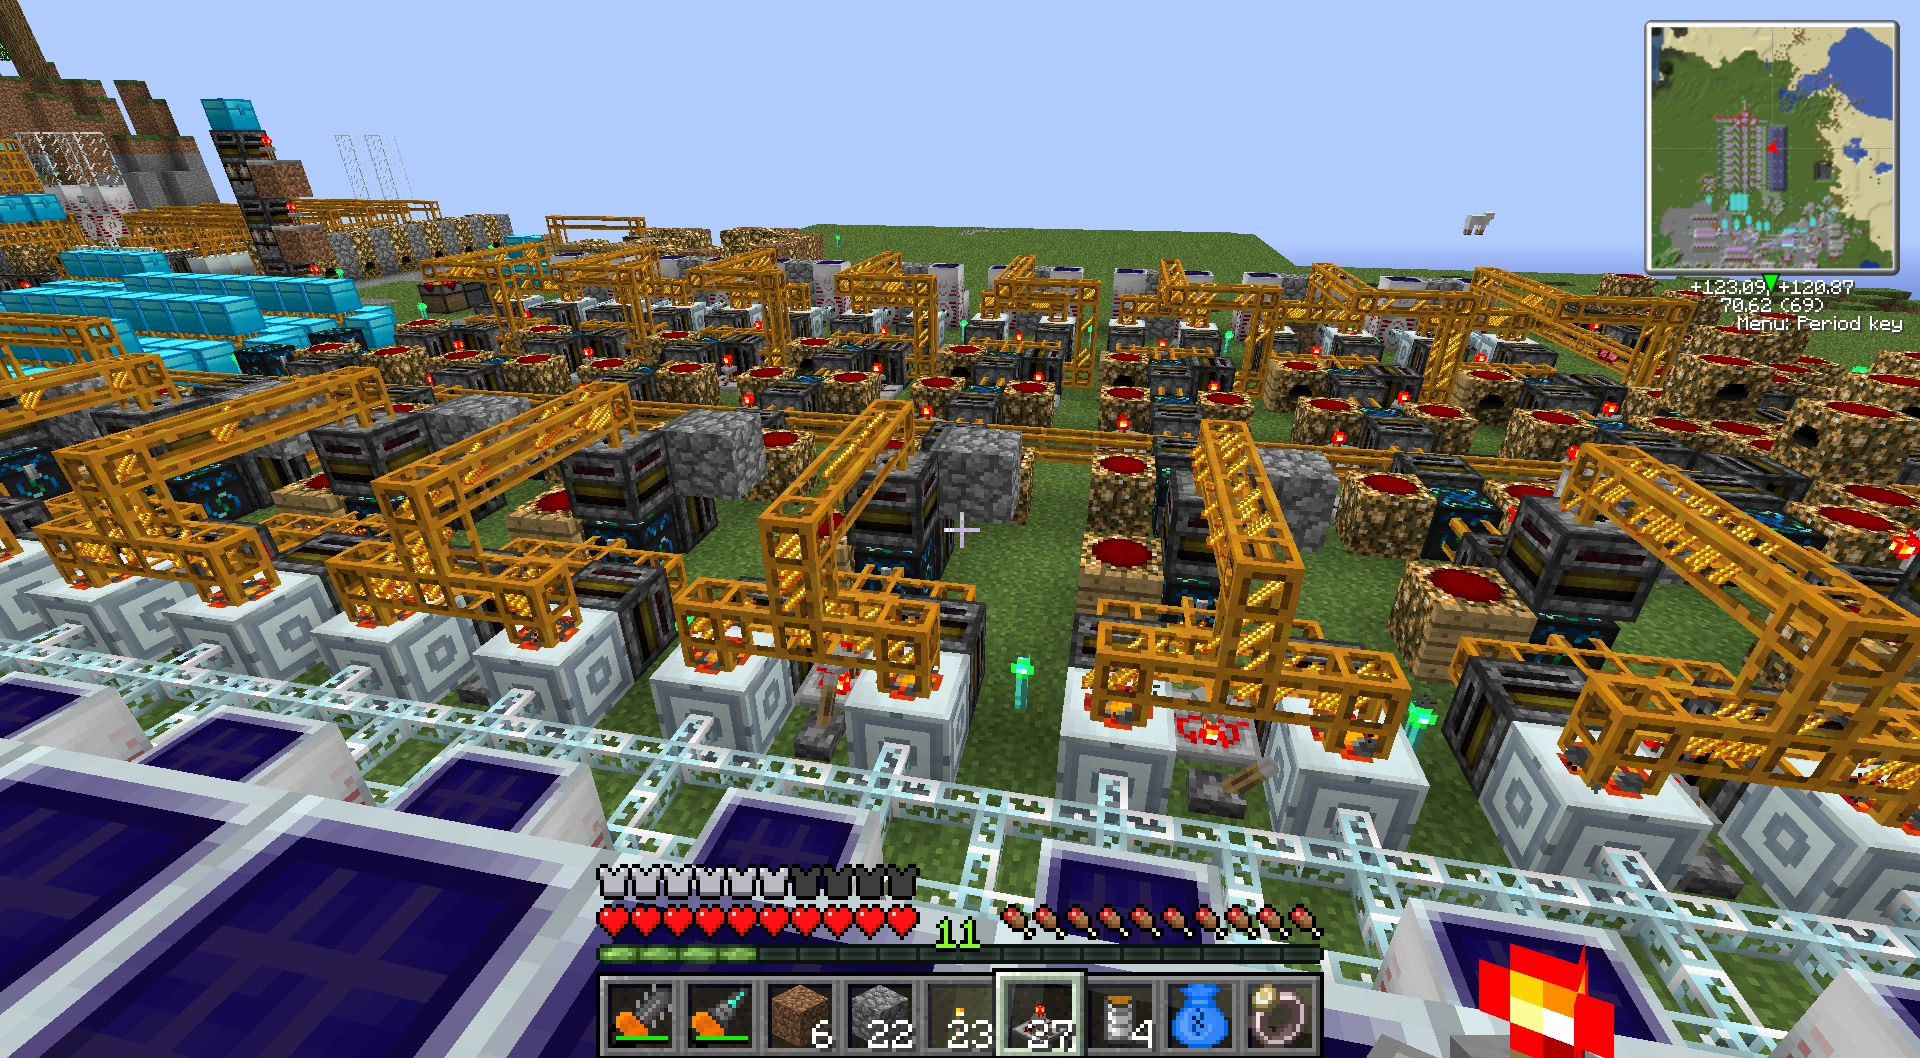
32 MFM's generating insane amounts of EMC. This compound has produced over 5 billion EMC, stored as Red Matter Furnaces in the diamond chest array to the left.
Now that you've made your first factory (or perhaps even more), it's time to start mass-producing copies of it to further amplify production.
Simply make another MFM next to the first one. You can share power thorugh a centralized cluster of HV Solar Arrays and MFSUs, improving efficiency of components. Now that you're fabricating EMC so quickly, you can probably skip the first few stages and jump to maximum speed for each new factory you build. The designs using Buildcraft would now be obsolete in every way (not that it wasn't already anyways). Eventually you'll have so much EMC, it will have no practical use besides for decoration and bragging rights!
Redstone-Powered MFM

A simplified, unstackable, slower version of Patric20878's original 1-wide, 3x4x1 stackable design. The original, which produces 537,600 EMC/min utilizing 13 overclockers each macerator instead of 12 and can be stacked near indefinitely onto itself without additional circuitry, may be found here and here.
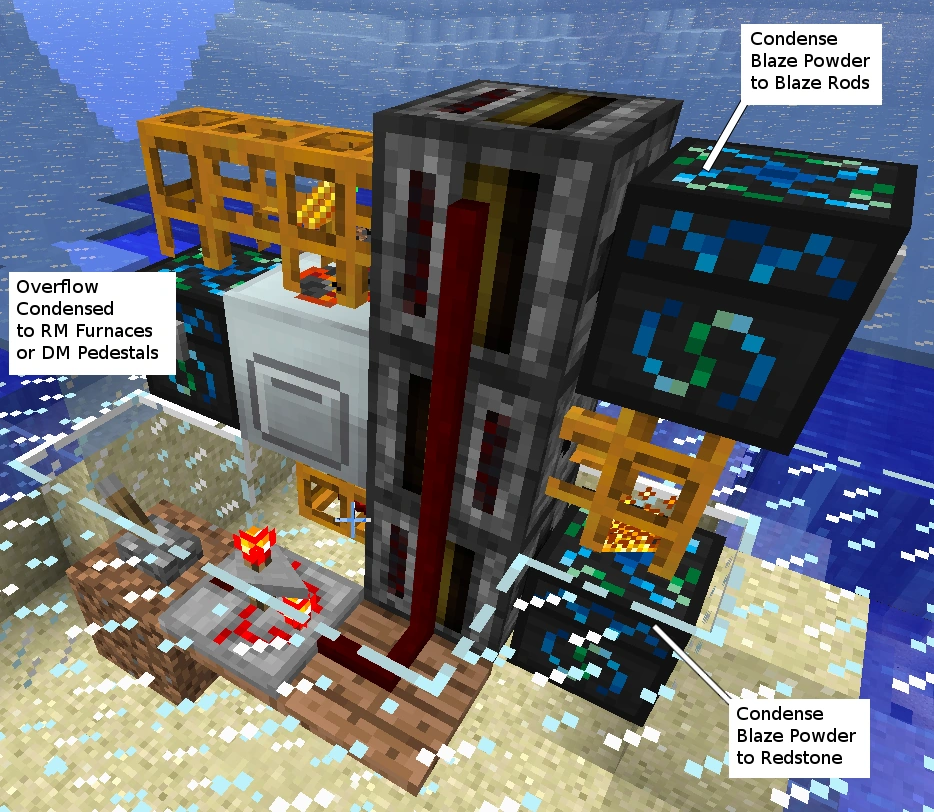
The Redstone-Powered MFM (RMFM) does not use any external EU power source such as generators and solar arrays; it's powered entirely by Redstone Dust, a condenseable fuel that converts into EU in IC2 machines and battery blocks. Some of the blaze powder go to the condenser producing redstone dust, which are pumped into the macerator. Because the macerator's power source comes from its own output (with ample EMC to spare), this MFM model is entirely self-contained. The condenser producing redstone requires very little of the MFM's energy output, so the system still produces substantial amounts of surplus EMC.

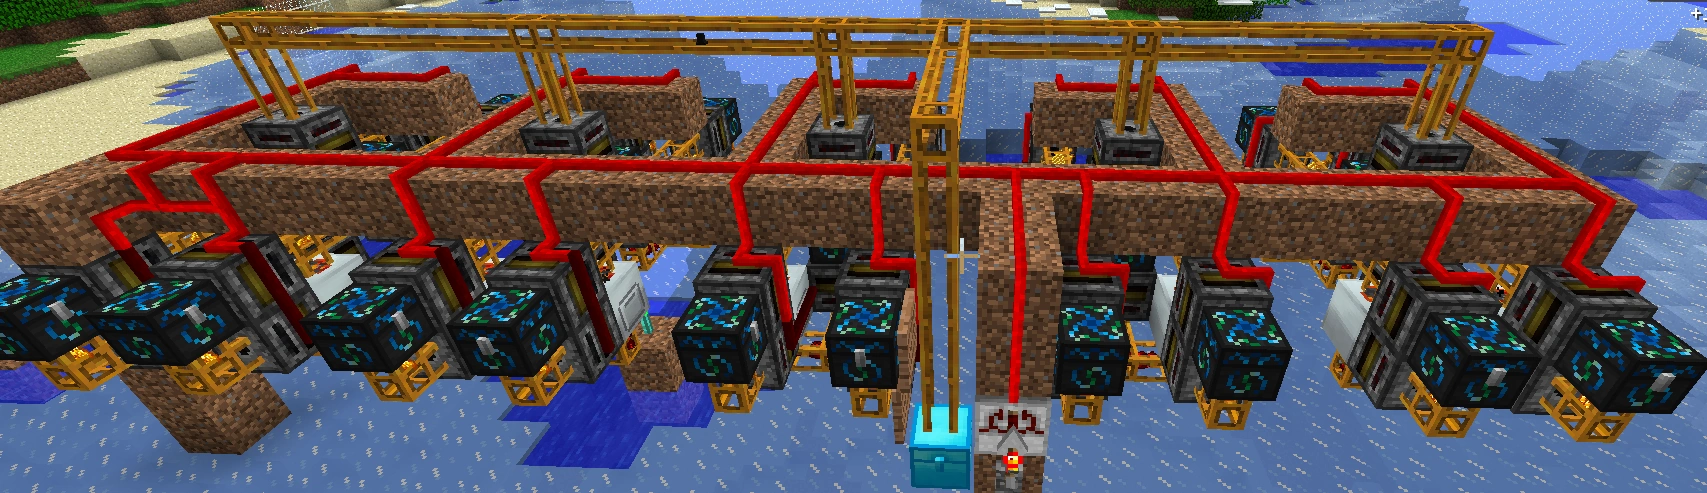
An array of 20 RMFMs. It produces approximately 2.8 DM Pedestals per minute.
Pros
1) Simple and Convenient: The system is self-contained. With sufficient overclockers (up to 13) the RMFM requires no additional power source. In contrast, models powered by solar panels or generators either require access to sunlight or an additional EMC source anyways to condense the coal or lava, making the latter a redundant workaround.
2) Compact: A solar-powered MFM has to expose its solar panels to sunlight somehow. This makes it inconvenient and invasive to operate one at bedrock level or inside a large building. Non-solar power supplies (like geothermal) take up extra space and must be fed fuel by some means (automated or otherwise). In contrast, an RMFM is compact, self-contained and self-sufficient. It requires no power wires, external power sources, or other dangling bits. A whole factory can fit inside a 2x3x4 meter area, with each additional one requiring another 1x3x4 of space when stacked onto the first.
3) Scalability: It is much easier to expand a well designed RMFM, as it simpler and more compact than other types of MFM's. Increasing your EMC generation with RMFM's only require you build more RMFM's, without needing to place additional external power sources. There are still components that must be manufactured (preferably by dedicated factories), but the most resource-intensive components (the 3 condensers and a preferably EMC-dense item for output condenser, like RM) can all simply be produced from the output of your first MFM. Not requiring generators or solar panels and batteries means a lot less work, particularly when dealing with MV/HV Solar Arrays, MFSUs, etc.
Materials that must be constructed (non-condensable):
- 1 Macerator
- 4 Pneumatic Tubes
- 12 Overclocker Upgrades (13 requires additional materials and semi-complex logic, not covered here)
- 3 Filters
- 1 Timer
- 4 Red Alloy Wire
Likewise, these materials can be condensed from the output of your first MFM:
- 3 Energy Condensers
- starting redstone dust, blaze rods, and blaze powders
In contrast, MFMs powered by solar panels or generators must also duplicate or scale those power sources, which is expensive and time-consuming without extensive support factories (HV Solar Arrays and MFSUs are a lot of work). Skipped components include:
- Electric Cables/Wires
- MV or HV Solar Arrays
- MFSU to store energy for night-time operation
This means the RMFM is easier to construct, as labor- and component-intensive solar panels and other power sources are cut out of the process entirely. However, an additional condenser and filter are required for feeding redstone dust to the macerator.
The RMFM also requires fewer upgrades, as transformer upgrades are pointless and energy storage upgrades are unnecessary as well. And it won't explode from too high voltage power - redstone dust does not operate with voltage to supply EU to machines, and thus cannot cause them to explode.
Cons
Speed Limit: There is a hard limit on how fast redstone can power machines, and this is exactly equal to the machine's buffer, which in the macerators case, is 800 EU. Therefore, redstone dust can power one at 800 EU/t max, as redstone does NOT convert itself into 500 EU in machines like it does in battery blocks, rather, it CAPS OUT the buffer every tick. 12 overclockers is NOT the maximum an RMFM can handle before it can't consume its fuel fast enough to power itself effectively, but it is the easiest to make. A 13-overclocker RMFM requires additional materials to handle the logic solving the new problems of overflow. For more information on deep mechanics and math for machines, redstone dust as fuel, and overclockers, message Patric20878.
This means you should build a second RMFM when the first one is not enough. The real con is not building a 2nd one, it's servers that limit you to a maximum number of macerators, which in that case, you should build standard MFM's and max out each macerator with 16 overclockers (along with the appropriate number of transformers for your power voltage [i.e. 2 for HV Solar Arrays and MFSU's] and 1 energy storage upgrade), and at least 3,689 EU/t to each macerator.
No Bones: The second disadvantage (albeit minor) is that the RMFM won't work well with bones. You'll need to power a bone MFM with solar power instead or a few overclockers max, as 12-overclocker RMFM's requires more EMC for its own fuel than it can generate with bones. So you'll have to obtain blaze rods, or stick with a much much slower production rate (which eliminates most of the MFM's advantages). A much better early-game alternative to using bone MFM's in general is using a cow-milker EMC generator.
Comparative Analysis of MFMs
Let's compare the investment cost and output of a few MFM models, assuming just a single MFM. For in-depth explanation on EMC generation formulas, calculation, and mechanics, message Patric20878.
12-OC Blaze-RMFM
Easiest to make, requires no additional logic beyond the simple positive feedback loop. Excess blaze powder both fuels the redstone condenser and is output into RM.
Core physical and logical components:
- 1 Macerator (2,845)
- 3 Energy Condensers (126,033)
- 3 Filters (15,651)
- 3 Pneumatic Tubes (96)
- 12 Overclocker Upgrades [Macerator] (21,864)
- 1 RM [Condenser] (466,944)
- 1 Blaze Rod [Condenser] (1,536)
- 1 Redstone [Condenser] (64)
- 24 Redstone [Filter] (1,536)
Assembly Cost: ~636,569 EMC
EMC Output: 2,304 EMC / 0.3s * capAt100%(800 EU-buffer / 562 EU-consumption) = 7,680 EMC/s
EMC Drain: capAt100%(562 EU-consumption / 800 EU-buffer) * 20 RS/s * 64 EMC/RS = 899 EMC/s
EMC Net Output: 7,680 - 899 = 6,781 EMC/s, breaks even in ~94 seconds.
Patric20878's 13-OC Blaze-RMFM
Requires semi-complex alternately-outputting filter logic to accomodate for two kinds excess materials as a consequence of higher maceration rate: both blaze rods AND powder. Excess powder fuels the redstone condenser. Both excess rods and powder are alternately output into RM. 32% higher net EMC output than a 12-OC one, also directly and adjacently stackable with itself thanks to alternately painted redstone tubes.
Core physical and logical components:
- 1 Macerator (2,845)
- 3 Energy Condensers (126,033)
- 3 Filters (15,651)
- 3 Painted Redstone Tubes (300)
- 13 Overclocker Upgrades [Macerator] (23,686)
- 1 RM [Condenser] (466,944)
- 1 Blaze Rod [Condenser] (1,536)
- 1 Redstone [Condenser] (64)
- 24 Redstone [Filter] (1,536)
- 16 Blaze Rods [Filter] (24,576)
- 64 Blaze Powder [Filter] (49,152)
Assembly Cost: ~712,323 EMC
EMC Output: 2,304 EMC / 0.2s * capAt100%(800 EU-buffer / 900 EU-consumption) = 10,240 EMC/s
EMC Drain: capAt100%(900 EU-consumption / 800 EU-buffer) * 20 RS/s * 64 EMC/RS = 1,280 EMC/s
EMC Net Output: 10,240 - 1,280 = 8,960 EMC/s, breaks even in ~80 seconds
16-OC HV Solar Powered Blaze-MFM
Highest possible EMC generation rate per macerator, literally macerating as fast as Minecraft's 20 ticks per second tickrate can support, as that's what sufficiently powered 16-OC macerators do. But due to its ridiculously high assembly cost (requires 14 HV Solar Arrays and 8 MFSU's!), not recommended at all except in very special cases (discussed in conclusion). With sufficient power (people almost NEVER use the right number of HV Solars/MFSUs, typically way too less), this design macerates 20 blaze rods a second, flooding your output condenser with more blaze powder than it can even condense into EMC.
For that reason, you either need 3 equally distributed output condensers to condense 60 excess blaze powder a second into EMC fast enough (along with even more filters and condensers for the final output), or the superior method of simply putting a gem of eternal density in the output condenser's condense slot instead of an RM (Yes, alchemical chest is cheaper, but as they don't have a "safe location" like condensers' condense slot to prevent the gem of eternal density from being pumped out, you'll end up needing to add an additional RM into the filter, obviously more expensive than using a condenser is.) While the gem of eternal density is more expensive than 3 condensers, it more than makes up for it by not requiring a final output chest that ultimately still needs an RM in its condense slot, thus saving EMC and compacting the design.
Core physical and logical components:
- 1 Macerator (2,845)
- 2 Energy Condensers (84,022)
- 2 Filters (10,434)
- 2 Pneumatic Tubes (64)
- 16 Overclocker Upgrades [Macerator] (29,152)
- 2 Transformer Upgrades [Macerator] (9,704)
- 1 Energy Storage Upgrade [Macerator] (2,030)
- 1 Gem of Eternal Density [Condenser] (319,616)
- 1 Blaze Rod [Condenser] (1,536)
- 14 HV Solar Arrays [EU Supply] (36,483,118)
- 8 MFSUs [EU Supply] (1,172,224)
- 8 Glass Fiber Cable [EU Supply] (12,304)
Assembly Cost: ~38,262,643 EMC
EMC Output: 2,304 EMC / 0.05s * capAt100%(4,096 EU-input / 3,689 EU-consumption) = 46,080 EMC/s
EMC Drain: N/A, this isn't a RMFM. Solar power doesn't require EMC, it requires the sun = 0 EMC/s
EMC Net Output: 46,080 - 0 = 46,080 EMC/s, breaks even in ~830 seconds
Conclusion
As one can see from above analysis, it is grossly inefficient to increase your EMC production by building additional 16-OC HV solar powered MFM's. For over 38 million EMC in assembly costs, you could generate over 480,000 EMC/s by building additional RMFM's instead of just 46,080 EMC/s, which is over 10 times more efficient EMC-wise, making it easily superior to HV solar powered MFM's in almost all stages of the game. The only two very special cases you should rely on HV solar powered MFM's instead of RMFM's, as mentioned above, are A) when the server you're playing on limits your EMC production with a hard macerator limit (e.g. 4 total), effectively forcing you to max out production per macerator, and B) in super-late game, where you have so much factory and EMC production capability that your actual FPS performance is the limiting factor (you can only stack so many factories before it starts lagging the whole server). Only then, in these two cases is it a viable and even recommended idea to sacrifice efficiency to maximize EMC production by macerator, rather than by time, EMC, or other resources.
Tutorial Video

How to make a Mass-Fab Macerator in Tekkit
How to make both a Solar powered and Redstone Powered Mass Fab Macerator